
These STEM challenges and experiments will keep your students engaged and facilitate in hands-on learning that is not only helpful for their comprehension, but fun as well! Best of all, they all require minimal materials and use SOLO® cups that can be reused or repurposed after you're students are finished. Now that's a good deal!
.png?width=222&name=1%20(4).png)
This engineering challenge is great to encourage team work in your classroom. All you need for this exercise is 6 SOLO® Cups per team, rubber bands, and yarn.
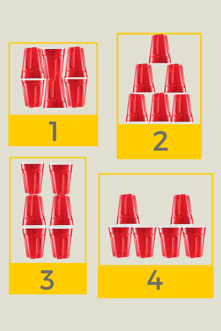
How to Take the Solo Cup Engineering Challenge: give teams of 4-6 students 6 SOLO® Cups, and a rubber band that has an equal number of strings of yarn tied to it as many students there are in that team. The yarn should be about a foot in length. There are 8 different SOLO® Cup structures that your student must engineer without using their hands. Instead, each student must hold a piece of string and work together with their group to guide the rubber band and create the structures.
At the beginning of each round, have the students stack their cups upside down, making sure that they are not suctioned together. When all teams are ready, have the students build the structure demonstrated for that round. The first team to build the structure wins! Complete with all 8 structures, then have them fill out a reflection worksheet. Here are possible questions the worksheet may ask:
- Describe what your role was on your team? What were you doing during the building process?
- How successful was your team compared to the rest of the class?
- What did your team do well? What could your team have improved on? Be specific.
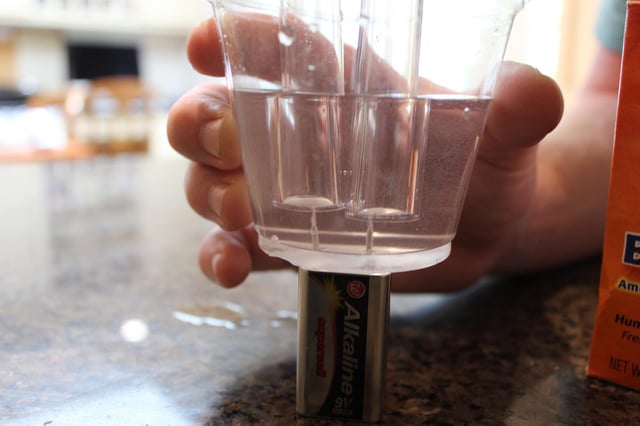
This experiment demonstrates electrolysis visually, and can be used to visualize energy or electricity through the gasses produced. What you need to conduct this experiment is: tap water, distilled water, silver colored thumb tacks, 9 volt batteries, SOLO® Clear 9 oz Plastic Cups, and test tubes. Using these materials, test which electrolyte conducts energy the best: baking soda, table salt, lemon, or dish washing detergent.
How to Conduct the Experiment:
- Poke two thumb tacks into the bottom of your SOLO® Clear Plastic Cup so that they are spaced the same distance apart as the terminals on the 9 volt battery. The points should be pushed inside the cup.
- Place the cup on the battery so that the tacks match up with the terminals. If the cup isn't able to balance on its own, stabilize it with books or another item on either side.
- Carefully fill the cup with distilled water, making sure the terminals and tacks remain lined up.
- Add one of your electrolytes: a pinch of baking soda, a sprinkle of table salt, a few drops of lemon juice, or a squirt of dish washing detergent.
- Hold a test tube over each tack to collect the gases being formed. Record your observations!
- Empty the cup, then repeat the experiment until you've tested all the electrolytes. Also try the experiment with just tap water: does it work on its own? Now try it with distilled water: does it give the same result as the tap water?
The results your students should get are that tap water will conduct a small current on its own, whereas distilled water only works when it is made into a solution. Different gasses are created from different solutions, such as hydrogen, oxygen, and carbon dioxide from distilled water & baking soda, and chlorine gas from distilled water & table salt. Additionally, different amounts of gas are created from different solutions because each solution carries a varying amount of current!
Naked Egg Osmosis
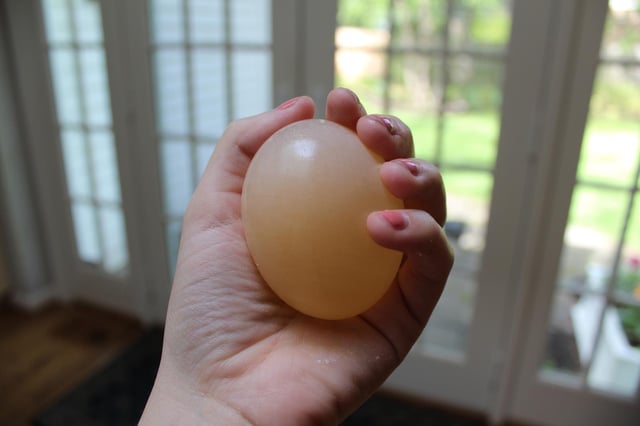
Have you ever seen an egg without a shell? We're going to guess you haven't, but once you conduct this experiment you'll be able to say that you have! This experiment demonstrates the semi-permeable membranes of the egg through osmosis, as well as the power of chemical reactions. What you'll need to conduct this experiment is SOLO® Clear Plastic Cups, eggs, vinegar, water, and corn syrup.
How to Make a Naked Egg:
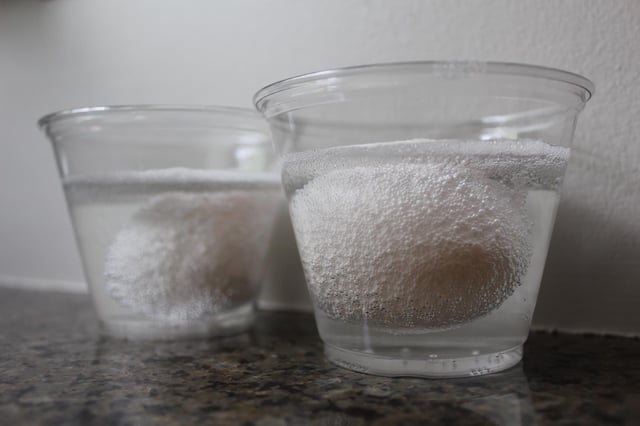
- Place your egg in a SOLO® cup filled with vinegar. Let it soak for a day.
- Carefully pour out the vinegar into a sink, gently catching the egg from the cup.
- Some eggs may be completely naked by this time, as the vinegar will have dissolved the shell. Some may have shells that can be carefully rubbed off with your fingers--though this can be tricky because the eggs are very fragile without their shells! If your egg is not fully naked, soak it in a fresh cup of vinegar for another day.
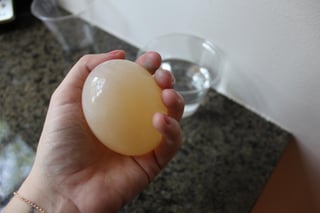
- After two days of soaking, your egg will be completely "naked." It will also be a bit larger, because osmosis has taken place and the egg has absorbed water from the vinegar!
Grow Your Naked Egg:
- Place your naked egg in a SOLO® cup full of water. Over time, the water in the cup will soak inside the egg in order to equalize the amount of water inside and outside of the membrane. This will cause the egg to swell! (Tip: this can be enhanced by using food coloring in the water--the inside of the egg will become colored as well!)
Shrink Your Naked Egg:
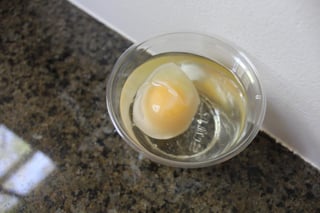
- Place your naked egg in a SOLO® cup full of corn syrup. Over time, the water inside the egg will move across the membrane into the corn syrup in order to equalize it. If you leave your egg in corn syrup long enough, it will look shriveled, like a giant, yellow raisin. All that will be left is the yolk!
The process of shrinking and growing your naked egg can be repeated ad nauseam!
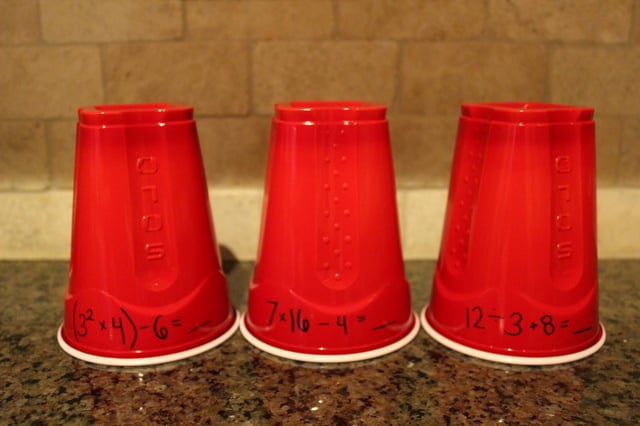
SOLO® Power Towers
This game is a great way to practice new math skills in a way that isn't simply filling out a worksheet, and all you need are SOLO® Cups and a marker! Simply write example problems of whatever skill your students are learning in math on SOLO® Cups. Have two students go head to head, giving each student 30 cups. Set a timer for 2 minutes, then have the contestants compete! Each student will pull a cup and solve its problem. The students may not move onto another problem until they have solved the one they are currently working on correctly. Once the student has solved the equation, they use the cup to begin building a structure. At the end of the two minutes the student who has built the biggest structure (thus has answered the most problems correctly) wins!
Get all the Solo® products you need for this school year at Walmart.

